March 13, 2024
How to plan and design your application
by VIKTOR
Build successful applications
Learn how you (developer, engineer, end-user, domain expert, project manager, etc.) can contribute to the creation of apps that provide real value to your work.
Gather the right team
Building an application isn’t done by software engineers only. In the ideal situation, it should be a collaboration between the software developers who write the code, the domain experts who have the specialised knowledge (e.g. geotechnical engineering), the end-users who are going to use the application once it is finished, and the product owner who is the bridge between all of them.
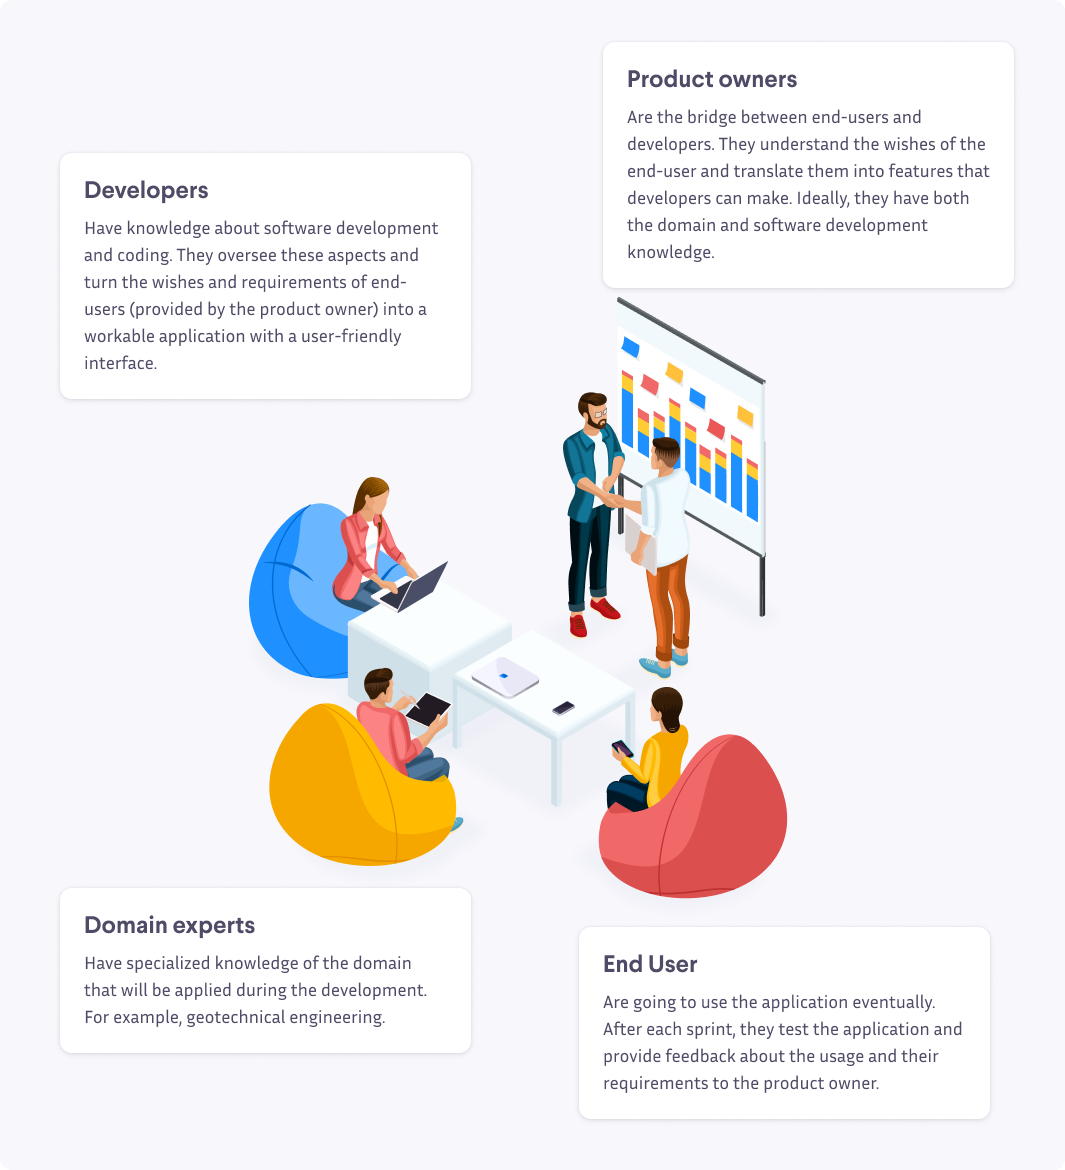
Sometimes the domain expert is also the one building the tools, and that is fine. However, even though it is possible for one person to take on multiple roles, this does not mean that a role can simply be left out or that you won’t need to have separate end-users to test your tool. Especially the latter is the first and biggest mistake you can make: Assuming that, because you are able to use a tool and you find it handy, other people will think this as well. So, it is important to involve a representative group of end-users from the very beginning of the development on.
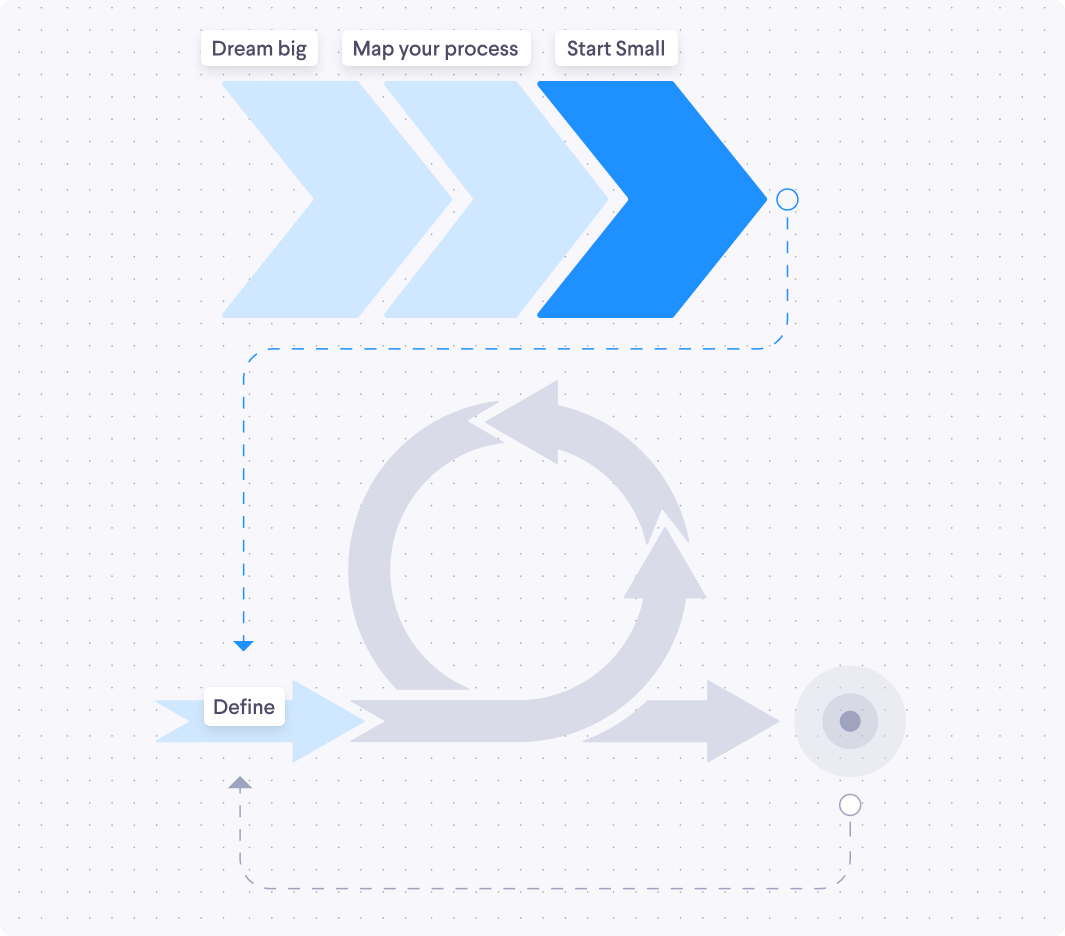
Dream big, start small
An application can be built for all kinds of processes, such as automating a repetitive task and making people’s work more fun. Maybe you have a big idea and want to build a large and complex application. That is nice; we like that! Having such a point on the horizon is great and works very motivating. However, creating such an extensive application can also become very complex and frustrating. Well, we are here to tell you: Don’t let this stop you; we have a solution to make it work!
Think outside of the box
Building an awesome application requires creativity. Therefore, we recommend people open their minds, get out of their comfort zone, and don’t be scared to give some new things a try. Think about the big dream you want to achieve. It will drive the development and be the motivation to keep forward. Dream in something like ‘I want to automate the design of a tunnel completely’, and when thinking about it, don’t focus on why it is not possible. Here we have a short story to make the point. Jaap Wierenga is the Lead Engineer in Hydraulic Engineering at Heijmans, a large Dutch construction company. He has more than five years of experience making pretty impressive automation tools. One of those is WILMA, a parametric design tool that automates the design of dikes. The funny part? In the beginning, Jaap Wiernega was the first to say: “This is not possible because of many, many, many, many technical reasons!”.
“I think it is very important to have a goal in mind, something to work towards, even if it seems very complex or impossible to achieve. Start with the easiest steps toward that goal. By starting this process, you will find your way, but keep focus on the big goals you want to achieve. Applications like this need to start small and grow organically. With each step, you will learn more about what is possible and what you need. You will also discover new possibilities and start getting more colleagues enthusiastic. It has a snowball effect, by parametrizing part of the design, and then keep adding small bits and pieces, you get closer sooner than you might have expected.” - Jaap Wierenga, Lead Engineer Hydraulic Engineering at Heijmans
Break it down
Developing a complex application doesn’t necessarily mean you build a huge application that will take years to develop. It is very well possible to build a complex application without actually making it too complex for yourself and others. How? You just need to break it down into smaller pieces. For example, start by building something small that can solve only part of the problem, just like with the Agile method, remember? Dreaming of a big and complex application is good, but starting big can also tie the knot around your application’s neck really quickly. Many projects have already failed due to this approach. The problem? People are asking too much of themselves and their end-users. Going from 0 to 100 at once is a lot to take in and makes the development process unmanageable.
Keep thinking ahead
Thus, start small. But while you do this, you also need to think ahead. How else are you going to get there? This can be along the lines of ‘How can I make my application grow?’. To answer this question, let’s look at an example: Imagine you are building an application to calculate the structures of a bridge automatically. This is fairly complex, but you have to start building somewhere. This, for example, means that at first, you can only calculate certain parts of the structure. This may not seem much, but if you keep working on that, your application could be able to design an entire bridge at just the push of a button with time. Believe us; a lot is possible if you set your mind to it.
Understanding your process is key
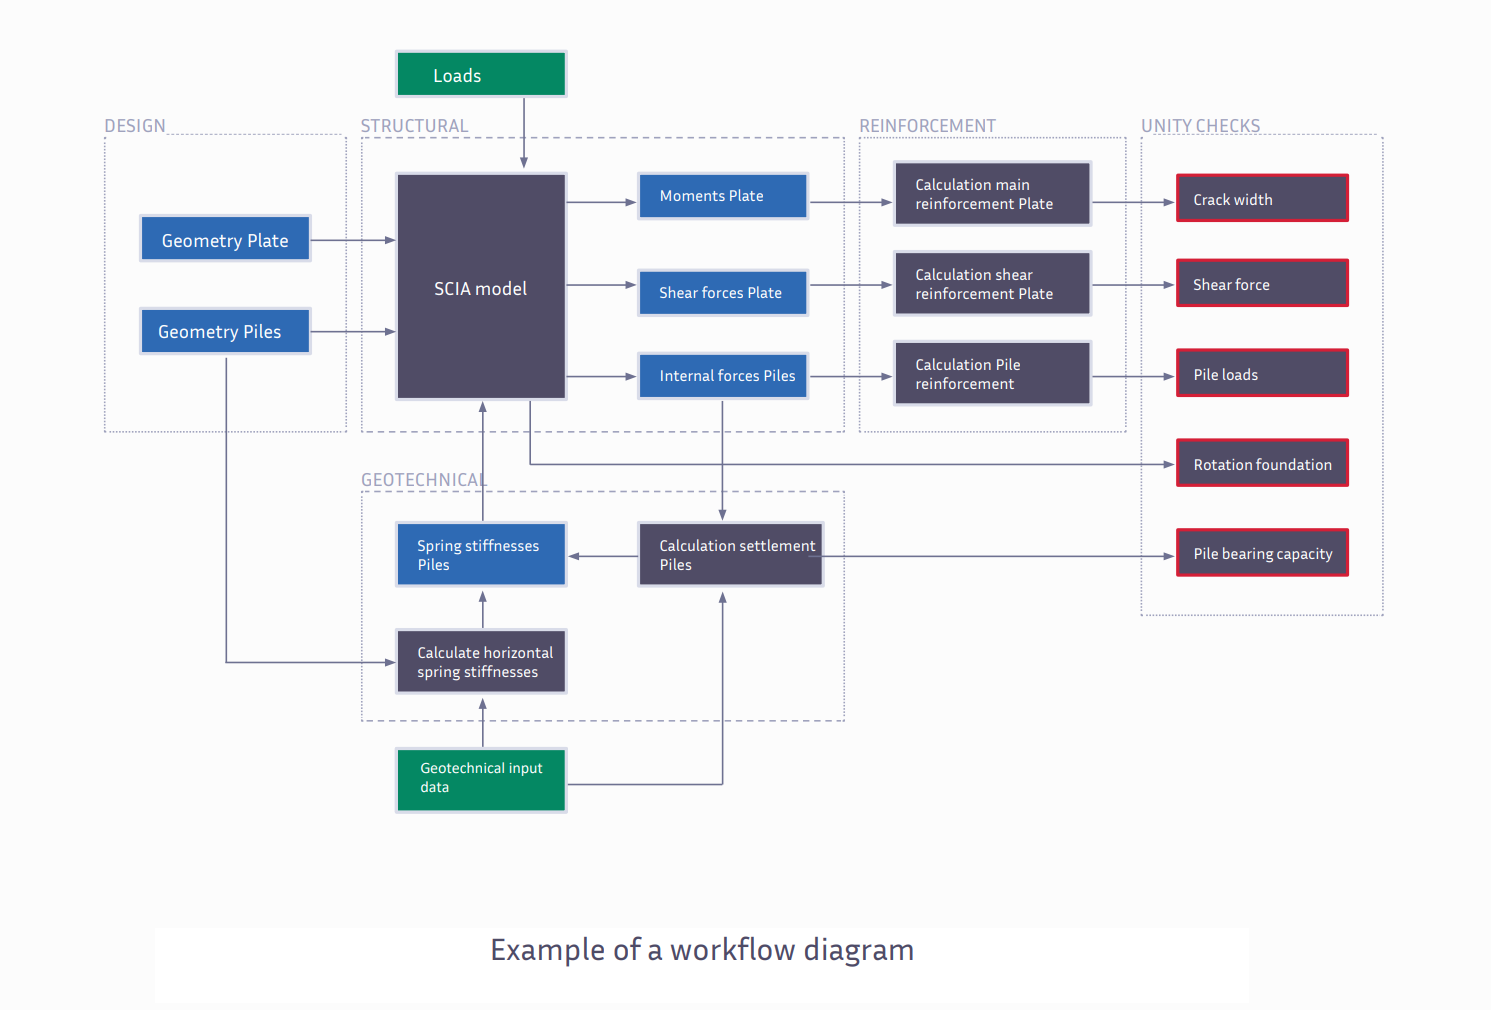
Now that you have a big dream, it’s time to flesh out how you will get there. The key to improving and automating a workflow is to understand it fully. Start creating a workflow diagram of the process that you want to turn into an application. For your workflow diagram, you will map out the whole process from start to finish with all details included. Remember, while a software developer can be super powerful in making calculations, they are terrible with improvisation.
"When you start looking at a problem and it seems really simple, you don't really understand the complexity of the problem. Then you get into the problem, and you see that it's really complicated, and you come up with all these convoluted solutions. That's sort of the middle, and that's where most people stop… But the really great person will keep on going and find the key, the underlying principle of the problem — and come up with an elegant, really beautiful solution that works. - Steve Jobs
The value of a workflow diagram
Here are five reasons why it is worth investing time in a good workflow.
- Overview and clarity: The diagram is important for everyone. Not only for the domain expert(s) to keep an overview of the workflow but also for the developer who will turn it into an application. All the steps in the workflow must be incorporated, even if everyone is assumed to know them. It is funny to notice that people often overestimate how well they know the working process of a colleague, while in reality, this is not true at all. It is good that everyone is on the same page.
- New insights: Humans are creatures of habit. A field specialist may find it logical to do things as he has always done it. A programmer, however, may look at it from a very different angle. Working together on the workflow and discussing all details is an excellent opportunity to improve the process.
- Anticipate critical aspects: Creating a workflow diagram helps understand the details and identify possible critical elements of the development. This can avoid a big headache later. Some important discussions are, for example, which software packages are used? Does this software have an API? How does information flow? In which format the data is shared, and is this always the case?
- A common language: By including the terminology of each part in the workflow diagram, you clarify how vocabulary should be used. This is important to avoid misunderstandings when multiple domain experts and developers are involved in the process. "When you start looking at a problem and it seems really simple, you don't really understand the complexity of the problem. Then you get into the problem, and you see that it's really complicated, and you come up with all these convoluted solutions. That's sort of the middle, and that's where most people stop… But the really great person will keep on going and find the key, the underlying principle of the problem — and come up with an elegant, really beautiful solution that works.
- Evaluate edge cases: Most time, a workflow diagram is made for the ‘standard’ situations that occur in about 95% of the cases. This is fine; you don’t want to overcomplicate things at the beginning. Once you are confident about having the proper workflow, try to evaluate some special situations. Maybe you don’t want to include these cases at the beginning of the development but making everyone aware of them can make the difference between incorporating them in the future or not.
Planning the first step
Once you have the final workflow diagram, you can figure out which (if not all) parts of the workflow can be made into an application. If the process is already contained, the whole thing can be an application. If the process is very large, start small and make it big. To select the first step, think about two things: Maximum impact and feasibility. In other words, where can you make a significant improvement or save a lot of time with little effort? That is always a good point to start.
Define requirements with user stories
A user story is an informal, general explanation of a software feature, written from the perspective of the end-user; something that the user should be able to do in the application once it is finished. This helps the developer understand what the end user is trying to accomplish when using the application and serves as a guideline when creating the different features. This form is chosen because the goal of the application is ultimately presenting value to the end-user.
User stories are usually built in the form ‘As a user, I want to…’. Examples of user stories are:
- As a user, I want to create and manage projects inside the app
- As a user, I want to design different bridges within each project
- As a user, I want to visualize the bridge as a 3D model
- As a user, I want to compare the results of different bridge designs
If you are creating a complex app, the user stories that are given as examples here could be too broad for a developer. In that case, it is recommended to create topics and think of more specific user stories per topic. For example, we will take the first user story from the previous list, assign it a topic, and make it more specific:
Topic: Manage and create projects inside the app
- As a user, I want to create projects
- As a user, I want to add properties to a project such as: The clients’ name, a project code, and a date
- As a user, I want...
Tip: Keep in mind that sometimes it is more important to communicate what you want to achieve and why you want to achieve it than how you are going to do it. Making super-specific requirements can hurt the development speed and quality of the product. Be clear about what you want to achieve but give the developer the freedom to find the best solution from their own perspective.
Make a time planning
After you have gathered your team and decided on which processes you are going to incorporate and how you should also make a plan for when you are doing all of these things. To ensure success, it is important to think about which steps should be taken at every moment of developing your application and make time estimations based on that before you start programming.
Even though the end goal is not specified completely within the Agile method, a time estimation should be made on when you will reach a finished product, nevertheless. This can be done based on the workflow diagram and user stories. For each of the user stories, a separate time estimation can be made thinking it is an isolated code block designed for a specific function. This is a good method because a time estimation is easier to make when it is for isolated functions that can be implemented next to each other instead of for the whole application at once.
Having a time estimation based on user stories also has other benefits: You can be very transparent about the progress to all parties involved and have a clear way to compare expectations and reality (what was easier than you expected? And what was harder and took more time and why?). This transparency helps generate mutual understanding and trust, which is beneficial when discussing any deviation from the original planning.
- Tip: When making a time planning, also take other aspects into account like communication with the end-users, project management, reviewing each other’s code, writing test, etc.,*
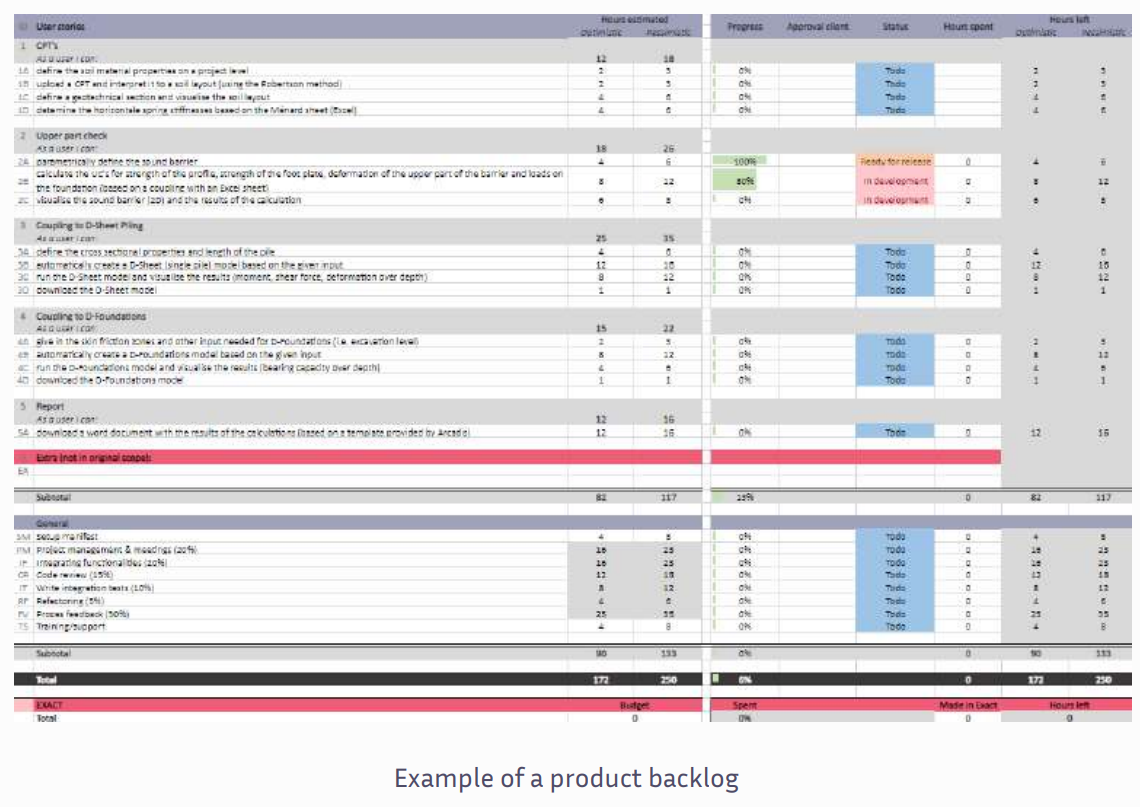
Create a product backlog
It is recommended to use a product backlog to keep track of time, budget, and progress. In the product backlog, you will add all user stories organized by topic, a time estimation for each user story, and its progress status. Examples of status could be: Pending, in development, under review, ready for release, and approved by the client. In the picture, you can see an example of a product backlog. You can download the product backlog template from the VIKTOR website.