
When multiple teams work on the same project, mistakes slip in. You often need to check whether the architectural, structural, or mechanical electrical and plumbing models contain the properties the project depends on. Think of construction phase, location in the building, areas, lengths, and the values used for quantity takeoff. The only way to verify this is to open each IFC model and review its contents. That manual QA and QC process is slow and prone to errors.
The most efficient way to tackle this is by creating custom automation to perform quality checks on your IFC model, but that requires coding knowledge. Fortunately, AI agents like the VIKTOR App Builder now let you create BIM apps with IFC data using just prompts.
In this tutorial you will gain first-hand experience using the VIKTOR App Builder by running the following three prompts:
- Prompt 1: Create an IFC Viewer
- Prompt 2: Create a Table listing non-compliant elements
- Prompt 3: Generate a color-coded 3D view highlighting non-compliant elements
You'll have a complete application that spots errors quickly, saves time checking IFC models, and can be shared with your team.
Prompt 1: Create an IFC Viewer
The first prompt, creating an IFC viewer, is an easy task for the App Builder. It can simply use built-in components such as an IFC viewer powered by IfcOpenShell, the most widely used Python package for IFC automation.
To create the viewer, run the following prompt and download the IFC sample model to test the app:

Build an IFC Viewer now!
Prompt 2: Create a Table listing non-compliant elements
For this tutorial, we will run a simple check on the model’s IFC wall elements to see whether they include an Area property. Since Area is needed for quantity take-off, we have to flag any walls that are missing this property so they can be corrected.
To visualize non-compliant walls, run the following prompt to create a TableView that highlights those rows. A table gives you a clear, sortable overview of all walls missing an Area value in the Qto_WallBaseQuantities property set.
1Add a "TableView" displaying all walls with columns for Wall ID/Name and Status. Color the rows red for walls missing area data and green for compliant walls.
2
3Consider the following when processing file:
4- Read IFC in binary mode and decode to text before processing
5- Use `by_type` to collect walls (`IfcWall`, `IfcWallStandardCase`) and `get_psets` from ifcopenshell.util.element to read area values; filter to rows where Area is missing.
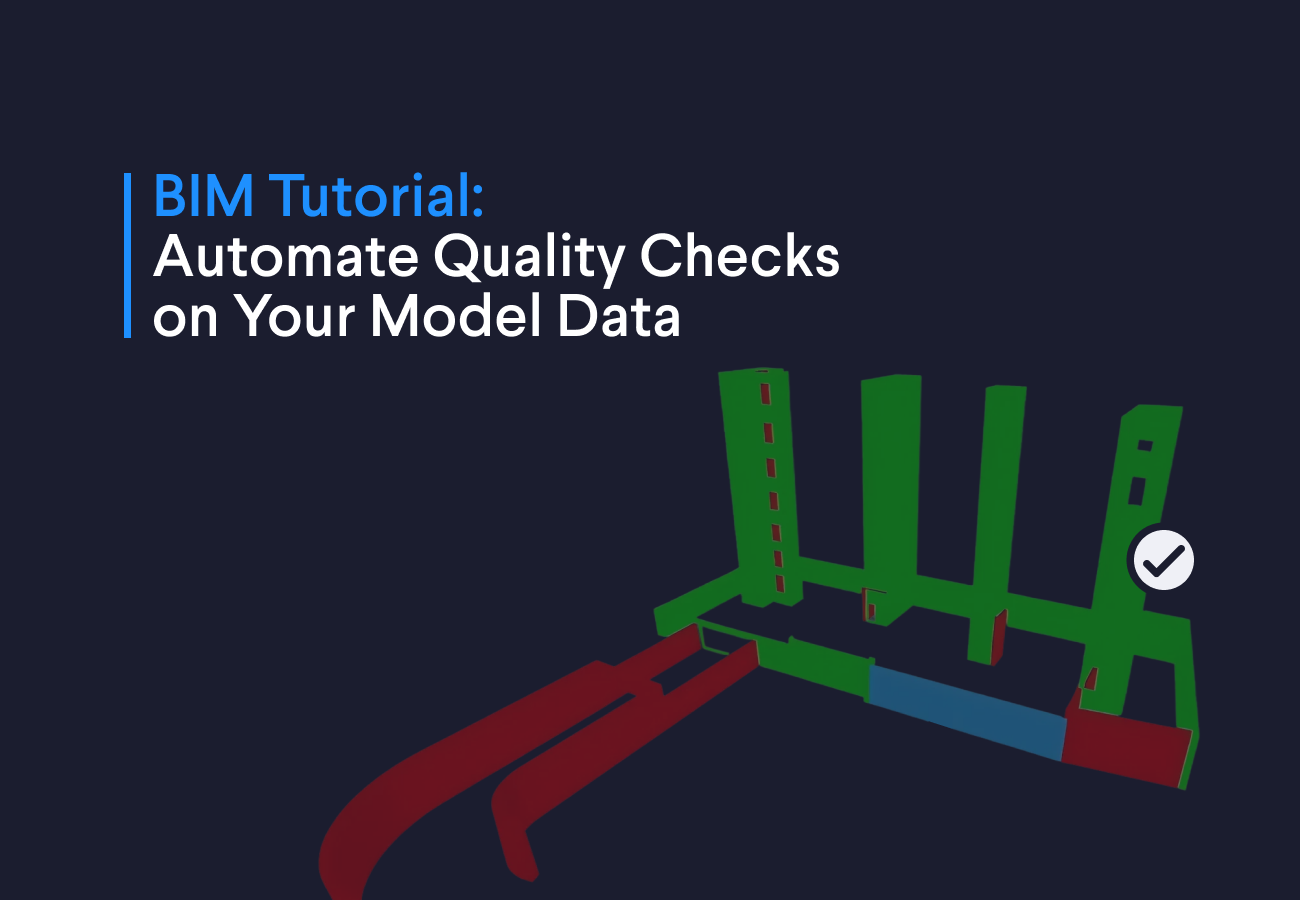
Prompt 3: Generate a Color-Coded 3D View with non-compliant elements
With the non-compliant walls clearly listed in the table, the next step is to make them easy to spot in 3D. Using the following prompt, create a separate IFC 3D view that highlights non-compliant elements in red and compliant elements in green so issues are immediately visible.
1Add a colored IFC view that highlights non-compliant walls (missing Area) in red and compliant walls in green. Keep the original model untouched and create a separate "IFC-Data View" showing the highlighted elements.
2
3Additional considerations:
4- Clear all existing IfcStyledItem entries that may conflict with the new styles (not just the root level)
5- Find and apply styles to the correct representation (usually "Body") for only the non-compliant elements
6- Use `ifcopenshell.api.run()` with `"style.add_style"`, `"style.add_surface_style"` (with `IfcSurfaceStyleShading`), and `"style.assign_representation_styles"` for the non-compliant elements
7- Use `to_string()` instead of `write()` when exporting to avoid BytesIO errors
With just three prompts, you’ve created a complete application that checks IFC wall properties, lists non-compliant elements in a table, and highlights them in a 3D IFC view!
How You Can Extend This App to Improve Your BIM Workflows
You can easily adapt this same approach for other use cases:
- Piping systems: Check if pipes have required properties like flow rate, pressure class, or insulation thickness. Try prompting: "Create a report showing all pipe elements and whether flow rate, pressure class, and insulation thickness are present in the property sets."
- Structural systems: Verify that beams and columns include properties such as load capacity, material grade, or fire rating. Try prompting: "Create a table of all beams and columns that shows whether load capacity, material grade, and fire rating are present in the property sets."
- Windows and doors: Make sure they have performance data like thermal transmittance (U-value), acoustic rating, or fire resistance class. Try prompting: "Create a color-coded table for all windows and doors showing whether U-value, acoustic rating, and fire resistance class are present in the property sets."
Conclusion
In just a couple of minutes, we built an app that automates quality checks on your IFC model. And as you saw earlier, you can extend the app to cover other element types and properties.
And there's more you can do with the App Builder. If you want to see how it works with Autodesk tools, take a look at this blog.
Start building apps for free

Related Blog Posts


Get our best content in your inbox
Subscribe to our newsletter and get the latest industry insights