June 02, 2026
Build engineering apps with Claude Code + VIKTOR SDK, and share them safely on the VIKTOR platform
by VIKTOR Team
This is where the VIKTOR platform becomes essential. VIKTOR turns AI-assisted app development into a controlled engineering workflow: apps can be developed with the VIKTOR SDK, validated against engineering logic, deployed in a governed environment and distributed safely across teams and organizations. By combining Claude Code with VIKTOR, engineers can move faster without losing the structure, control and reliability required for real engineering work.
In this blog post, we explain how this works and guide you through creating your first engineering app with Claude Code and distributing it through the VIKTOR platform.
VIKTOR customers build engineering apps in two ways:
- Most apps are built using the VIKTOR App Builder, an easy to use AI based tool that allows any engineer to automate their work quickly in the cloud, by means of prompting. Under the hood, the App Builder uses the VIKTOR SDK to build high quality engineering apps. The SDK is based on VIKTOR’s accumulated engineering knowledge and used in over 30.000 apps to date
- Power users, such as tech savvy engineers or development teams, use AI assisted programming tools like Copilot and Claude Code in combination with the VIKTOR SDK. In this process, they leverage the same powerful VIKTOR SDK to ensure that high quality apps are build, compliant with engineering standards, company policies and engineering best practices.
But using the VIKTOR SDK solves only part of the problem: building these apps is only the top of the iceberg. It takes a lot more to scale their impact and get these apps to be used by engineers safely on their projects.
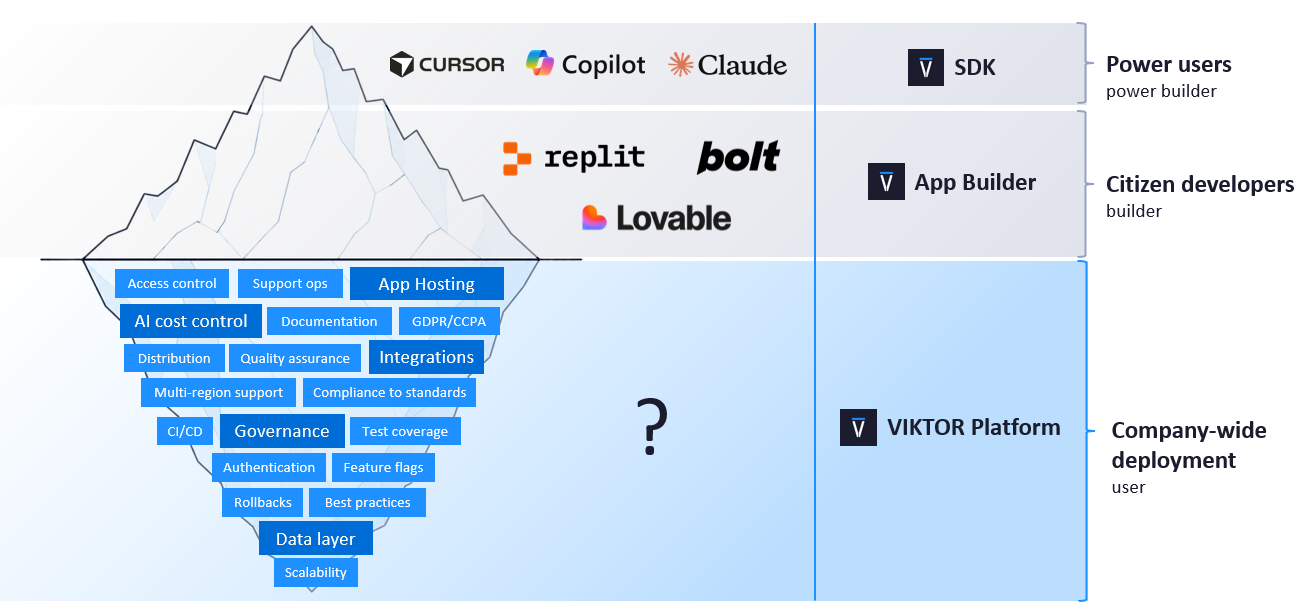
This is where the VIKTOR platform comes in. The VIKTOR platform makes it extremely easy to test, publish and deploy the apps, so you can focus on automating engineering work instead of setting up hosting, user access, deployment, infrastructure, and compliance workflows.

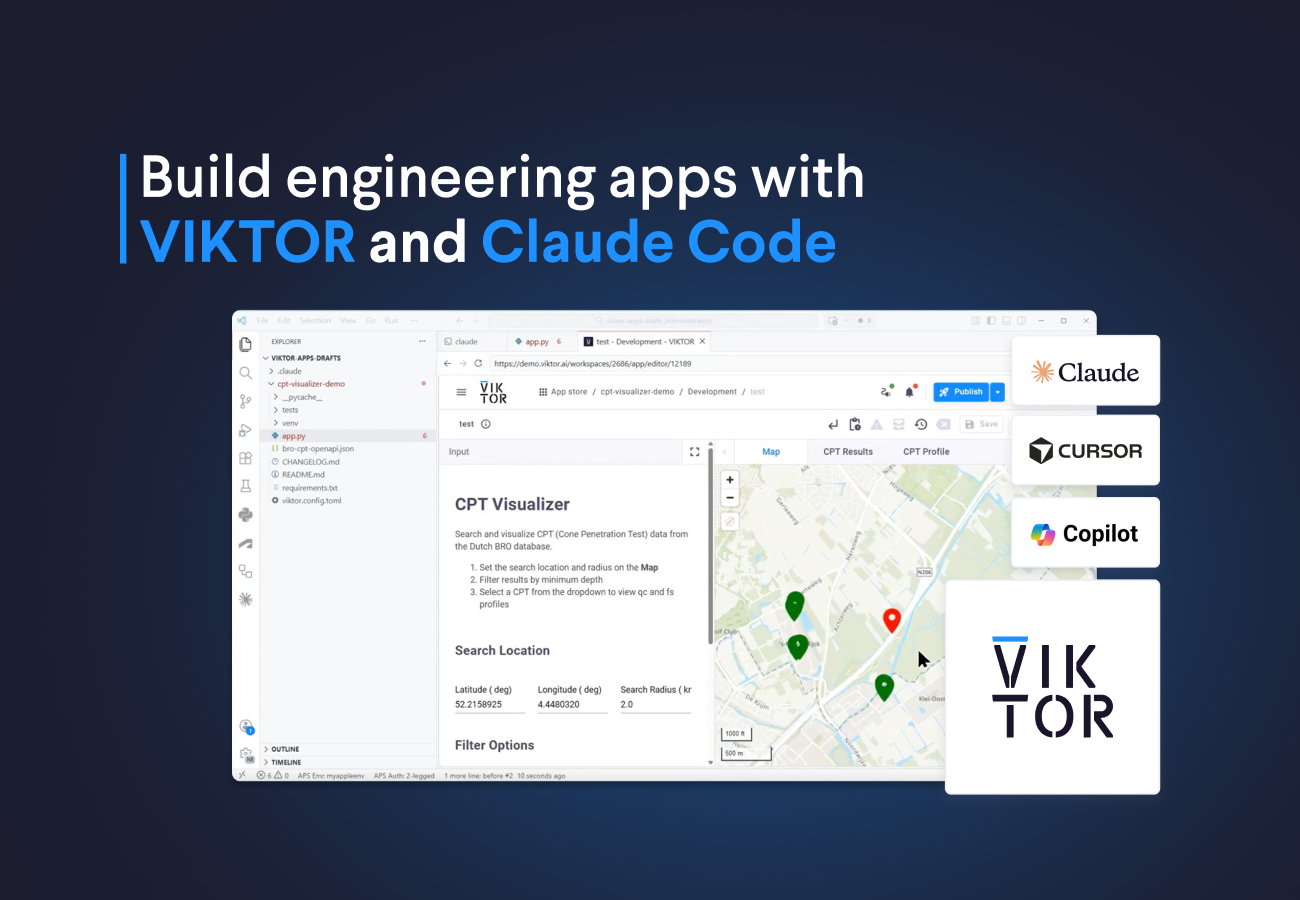
In this blog, we will build a real geotechnical workflow with VIKTOR SDK and Claude Code and publishing it safely and controlled, using the VIKTOR platform. The example is a CPT data app, but the same process applies to many engineering apps that need inputs, external data, calculations, visualizations, and a secure way to publish.
In this blog you will learn how to:
- Set up a developer environment for VIKTOR and Claude Code
- Create a blank VIKTOR app with Claude Code
- Build an engineering app with the VIKTOR SDK and Claude Code
- Debug an engineering app with Claude Code
- Improve engineering visualizations with screenshots and prompts
- Publish and distribute the app with the VIKTOR Platform
Set up the developer environment for Claude Code and VIKTOR
First, we need a development environment where Claude Code can edit the app files and where VIKTOR can run the application locally.
Start by installing the VIKTOR SDK and CLI (Command Line Interface). The process is straightforward:
- Create an account here
- Go to the Develop page.
- Click Develop app in your local IDE.
- Click Start installation.
- Follow the installation flow.
This setup ensures your local machine can create, install, start, and publish VIKTOR apps.
We will also use Visual Studio Code as our code editor. You can use another editor, but VS Code works well because you can open the project folder, use the terminal, inspect files, and run Claude Code in the same workspace.
Once everything is ready, create an empty project folder as you normally would do, open it in VS Code, launch Claude Code from the terminal, and start the tutorial from that folder.
Create a blank VIKTOR app with Claude Code
With the development environment ready, the next step is to create an empty VIKTOR application. We can use the VIKTOR CLI for this, and the easiest way to make Claude Code do it correctly is to give it the right documentation link.
Ask Claude Code to create the app with the VIKTOR CLI:
1Create a blank VIKTOR app named "cpt-visualizer-demo". Use the VIKTOR CLI for every setup task:
2register the app, create the app structure, and install the needed packages.
3Follow and fetch the CLI docs here: https://docs.viktor.ai/docs/create-apps/references/cli/#create-app.
4Install requests and Plotly.
5We will continue with the app later.
Claude should use the CLI to register the app, create the local app structure, and install the dependencies. When it is finished, you should see a VIKTOR app template in your project folder with files such as the controller, parametrization, requirements, and VIKTOR config.
You can also open the VIKTOR App Store and confirm that the application was created. If you want to understand the generated structure before continuing, read the VIKTOR starter guide. For now, the important part is that we have a clean app ready for the actual engineering workflow.
Build an engineering app with Claude Code
Now we can give Claude Code a more realistic engineering task. Instead of only creating the app structure, we will ask it to build an application that connects to an external data source, processes engineering data, and visualizes the result inside VIKTOR.
For this tutorial, we will use a geotechnical CPT workflow. The user selects a location on a map in the Netherlands, the app searches for nearby CPT investigations within a selected radius, retrieves the geotechnical data, and plots the CPT results.
Before running the prompt, we need two sources of context:
VIKTOR llms-full.txt: SDK context for Claude Code, available at https://docs.viktor.ai/llms-full.txt. More information about this in our llms.txt blog.BRO CPT API schema: external CPT data context from the official BRO CPT API, available at https://publiek.broservices.nl/sr/cpt/v1/openapi.json.
Run the following prompt:
1For my VIKTOR app "cpt-visualizer", fetch the VIKTOR LLM docs from https://docs.viktor.ai/llms-full.txt and the BRO CPT OpenAPI schema from https://publiek.broservices.nl/sr/cpt/v1/openapi.json.
2Save the BRO schema as bro-cpt-openapi.json.
3The app must use MapView to select latitude/longitude, with default latitude 52.2158925391191 and longitude 4.448032011364562, search BRO CPT data within an input radius defaulting to 2 km, parse the BRO endpoint response, filter by minimum CPT depth, show CPT points and distances on the map, and plot qc vs depth and fs vs depth in a PlotlyView for the selected CPT.
4Read both sources and use them as context for the implementation plan.
At this point, Claude Code should create the first working version of the application. It may not be perfect, but it should give you enough structure to run the app, inspect the behavior, and continue improving it.
Debug an engineering app with Claude Code
Claude Code is very good at handling complex coding tasks, but it can still make mistakes when you give it a lot of context. In this example, we give it both the VIKTOR SDK guidance and a full OpenAPI schema for BRO CPT data. That is a lot of information.
In my case, Claude made a mistake with a VIKTOR view. The fix was simple. I copied the terminal error, pasted it back into Claude Code, and asked it to correct the implementation. You can see how easy it is in the video below:
Improve engineering visualizations with Claude Code
After the app works, the next step is making it easier to understand. Engineering apps are not only about calculations. They also need clear tables, maps, charts, and views that help users trust the result.
For the CPT visualizer, the first PlotlyView worked, but the title and layout were not clean enough. I took a screenshot of the application, sent it to Claude Code, and asked it to improve the visualization.
This is a practical way to iterate. You build the first version, run it, look at the screen, and then use screenshots to guide the next improvement.
Publish and distribute the app with VIKTOR
After creating, fixing, and improving the application, the next step is sharing it with other people.
Normally, this part is where a simple engineering script becomes difficult. You need to think about deployment, hosting, user access, production updates, security, monitoring, and maintenance. That is not where most engineers want to spend their time.
With VIKTOR, you can publish the app to a production environment using 2 words with the CLI: viktor-cli publish
You can ask Claude Code to help with the publishing steps, but I like running this command myself.
Once published, your app can be distributed through the VIKTOR platform. This is where VIKTOR becomes more than a coding framework. It gives your engineering app the platform layer around it, so you can focus on workflow automation while VIKTOR handles the production environment around the app.
Wrapping up
In this blog, we used Claude Code and VIKTOR to create a complete engineering app. We set up the developer environment, created a blank VIKTOR app, connected external engineering data, debugged errors, improved the visualization, and published the app.
The value of this workflow is not only that Claude Code can write code faster. The value is that VIKTOR gives the app a secure place to run, be shared, and be used by other engineers. That means you can spend more time automating engineering work and less time dealing with infrastructure.
If you want to see how VIKTOR can help your team build and publish engineering apps faster, book a demo here.
Start building apps now
Related Blog Posts

Get our best content in your inbox
Subscribe to our newsletter and get the latest industry insights